Water softeners usually require very minimal maintenance on the user’s end. However, if you wish your system to go on to function properly and at maximum performance for a long period, then you may need to do a little more than simply pouring fresh salt into your brine tank every so often.
Moreover, adequate maintenance for your water softener will improve longevity and cut down on repair expenses. And the best part is that it’s pretty easy for all the homeowners to put up with.
In this article, we will enlighten you on everything you need to know about maintaining your water softener.
Water Softener Maintenance 101
Refill Salt
It is important to note that you do not need to complicate things for yourself in any way. Just take a look at the salt level in the brine tank of the water softener once every month.
In case you find it to be below ¼, simply refill it. However, if it is above the ⅔ mark, you don’t need to refill at all as it may cause bridging.
Draining the Brine Tank
It is vital to drain the brine tank of your machine for cleaning as well as troubleshooting purposes. First, let us make a clear distinction between pre-fill and post-fill systems in water softeners:
- A post-fill water softener system automatically refills the brine tank after one regeneration cycle ends. Therefore, water continues to be inside the system always.
- The pre-fill kind of system does not have water inside the brine tank, and hence, draining isn’t required at all, at least until it continues to operate smoothly.
Having said that, there are various alternatives for draining the first type of water softener, which is a post-fill water softener. Let’s have a look:
- You can simply try scooping all the liquid into a big container like a bucket for instance. By doing so, you will be able to transfer it back to your tank as soon as you have completed your cleaning process or anything else that you are planning to do. But as you would expect, you can only do this if your water is not too filthy and mostly clean and clear.
- The other way around is using a wet-vac machine.
- Alternatively, you can also consider setting up a regeneration cycle manually. During the process of brining, your water softener will automatically suck on all the water that is present inside the tank. Based on the model of your appliance, you can simply push and hold the “regenerate” switch to accelerate the regeneration process.
- Once the process begins, just push the switch once more to hop to the process of brining. After your brine tank is completely clear, you can choose to omit all other processes and move back into the job.
- The last alternative is vacating all the liquid in an appropriate pit. However, before moving the tank, make sure to put your water softener machine into the bypass. After that, just detach the fill pipe that links the machine’s brine tank with the chief valve (in the case of side-by-side water softeners) and the overflow pipe of the brine tank.
In case your model offers the salt grid feature, then it may be best to remove it as well. Moreover, you will have to take out one more component which is known as brine well. A brine well is the additional hose present within the appliance’s brine tank.
After this, you can easily go ahead to overturn your tank, but make sure to do it carefully. Watch out that if you vacate it in the house yard, the grass is most likely to turn a bit brown and wither.
How to Clean a Water Softener
In this guide, let’s take you through some water softener cleaning basics!!
Brine Tank Cleaning
It would be best if you chose to clean your brine tank once nearly all the salt has been used up. By this time, you won’t be required to take it all up manually.
Moreover, the tank won’t be very heavy at this point, so you will be able to carry it with greater ease. This will be helpful if you wish to move it outside so that you don’t end up creating a mess inside the house.
You will also be able to take a clear look at all the dirt or decay present at the bottom of your brine tank this way.
However, if the level of salt in the tank is high, you will need to get rid of it by hand.
Once you have taken all the water out, you can go on to follow all the cleaning steps mentioned below:
- Take out any salt or/and sludge that is left
- Clean properly from inside
- Put in fresh salt (as well as water in case of a post-fill water softener)
- Set the process of regeneration for the upcoming night hours
To get rid of any lingering salt or dirt, you can make use of a scoop or any other appropriate tool that you can find in your house. However, you must be cautious about not damaging the tank. Furthermore, a shop vacuum cleaner would work well for this purpose.
For the main cleaning process, make a solution of water and a decent dishwashing detergent. Keep in mind that you don’t need to use any severe chemicals, and in case you require scrubbing, you can use a brush. You don’t have to make your tank appear brand new. Just don’t miss out on rinsing the tank completely afterward.
Pro tip: You can also use this time to take a look at the machine’s float switch if it’s straight and is moving freely.
After everything seems to look clean and fine, you can go on to assemble all the parts back to how they were. Insert fresh salt. However, first of all, make sure to arrange your tank as it will be heavy enough very soon.
In the case of a post-fill water softener, you’ll also need to put in around 11 liters of water.
At last, set the machine for the regeneration process the upcoming night. This way, the machine will be back to work the subsequent day itself.
You can also watch this video to see how to clean Brine tank…
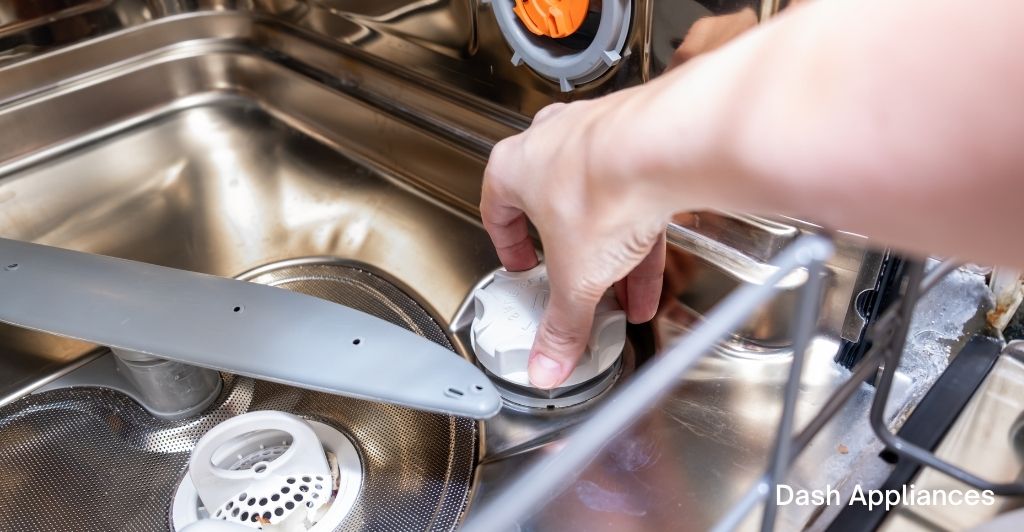
Cleaning the Brine Injector or Venturi Valve
A brine injector or venturi valve in a water softener works to draw brine out of the machine’s brine tank and put it into another component called a resin tank. They use a screen like a mesh net to prevent any filth from entering the new tank. Whichever you may have, it will eventually clog up, and therefore, you will need to clean it at least twice or thrice a year.
It is best to refer to your manual as the cleaning process varies depending on the model.
Sanitizing: Is it Okay to add Bleach to the Water Softener?
Once you are done with the basic cleaning, it may be a good idea to use bleach for properly sanitizing your brine tank. Just mix a couple of ounces of bleach with 10-11 liters of water and let it sit for around 20 minutes to get rid of any mildew. After that, use a brush to scrub a little and discharge the solution. Wash out the area thoroughly with water.
Resin Tank Cleaning
It is a good idea to clean a stinky bed using a resin cleaner, which will help renew the system capacity, improve the longevity of the resin, and make sure that other parts work properly—cleaning the softener’s resin tank once every 3-12 months is generally considered to be appropriate.
Here’s a video also on how you can maintain your water softener…
Salt Bridging and Mushing
Bridging
Salt bridging stops your salt from touching the foot of your brine tank, and this disrupts the regeneration process badly. In such cases, you can use a long stick and try pushing it towards the bottom. After getting rid of the bridge, initiate the regeneration process manually.
To avoid bridging, you should always add salt when you find the mark below ¼, and if it is above the ⅔ level, you don’t need to refill it.
Mushing
Mushing is another type of issue in the water softener, which arises when your salt first dissolves but then crystallizes again to create a heavy coating of dirt at the bottom of your brine tank. This can clog up your brine well and disrupt the regen process. Use a long stick to disband this mush or manually take it out.
You won’t be required to dispose of the salt in all cases, specifically when the salt is not excessively filthy. You can try dissolving the salt in warm water and transfer it back to your brine tank.
Why is Water Softener Maintenance Important?
- It is important to execute basic maintenance of your water softener to ensure it works efficiently and lasts for a longer period.
- Regular cleaning will also avoid clogging up your system and make sure that you are delivered with only the best water output.
- Lastly, it will help to avoid or at least decrease any repair expenses in the future.
Water Softener Maintenance Checklist
The following checklist includes all the tasks you need to accomplish for the basic maintenance of your water softener. You can easily do these on your own.
- Inspect the salt status
- Keep an eye out for any Salt Bridges
- Clear your Brine Tank
- A regular check on the Water Softener overall
- Make use of the appropriate type of salt
- Wash out the softener’s Resin Bed
Is it Better to Hire a Water Softener Service Professional?
While you can easily clean a water softener on your own using the steps mentioned earlier, it may be a good idea to reach out to a professional in case your issue seems too big to deal with or if you don’t wish to clean the machine yourself.
Ideally, it is best to hire a water softener service professional once a year or every 4-5 years for inspection and maintenance.
Final Thoughts
When you keep an eye on the status of your water softener now and then and clean it whenever required, it helps improve the longevity of your machine. This way, it functions smoothly for longer periods and you are delivered with only the best results.
However, you must also reach out to a professional to help you out occasionally to do the cleaning process right.
FAQs
What kind of maintenance does a water softener need?
A water softener requires very minimal maintenance, which is also very cheap. You just need to keep a check on the salt status, keep an eye out for any bridges, regularly clear your brine tank, and only make use of the appropriate kind of salt.
How often should you maintain your water softener?
Generally, a regular water softener requires maintenance and cleaning once a year to every 4-5 years. However, if you notice anything unusual with the functioning of your machine, cleaning your system as soon as possible is certainly the best thing to do.
What happens if I don’t clean my water softener?
In case you don’t clean your machine regularly or specifically when it is in immediate need of maintenance, the hardness of the output liquid is likely to increase. The water may also be discolored or have an absurd smell. This may be caused by a clogged-up system, and hence, you would want to clean it as soon as possible.
How often do you change the salt in a water softener?
It is a good idea to check the salt status of your machine once every 15 days. In normal cases, you should add new salt to your water softener twice a month.